Two years ago, we launched the color picker to help 2D artists in their colorization task in Blender. This tool addressed the issue of dealing with a model containing a large palette of colors (represented as grease pencil materials). Subsequently, we worked on the topic of exploring color palettes. Whether it is to find just the right palette for a character, offer alternatives, or have different sets of colors depending on the light environment, exploring palette colors in 2D can be tedious if the palette is large and contains many nuances.
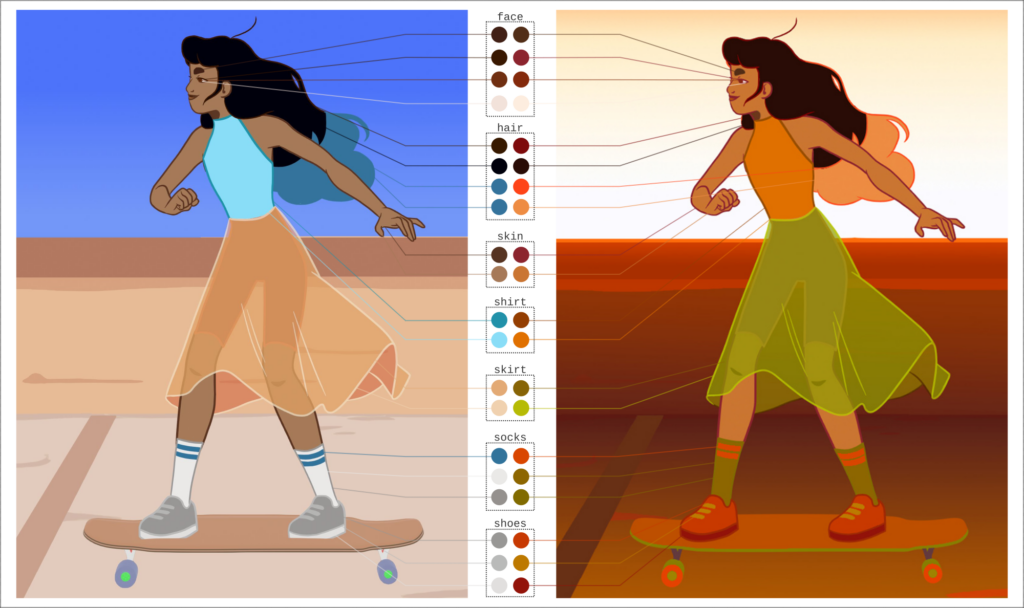
Example of color script that changes the light environment on our character Billie. Credit : Gaelle Diot.
Read moreThis article exists in French / Cet article existe en français.
A common way to explore color palettes is to change colors directly in the image, using a bitmap editing software, such as Krita. The whole process is then subject to the selection of color areas. This process can hardly be automatized, because semantically different areas of the drawing can have similar colors, and a semantically consistent area could contain multiple colors due to blending, or other rendering effects. This is especially an issue if we want to apply the color change consistently in a whole animation.
Mapping a color using the “Selection by color” tool in Krita can lead to unexpected results.
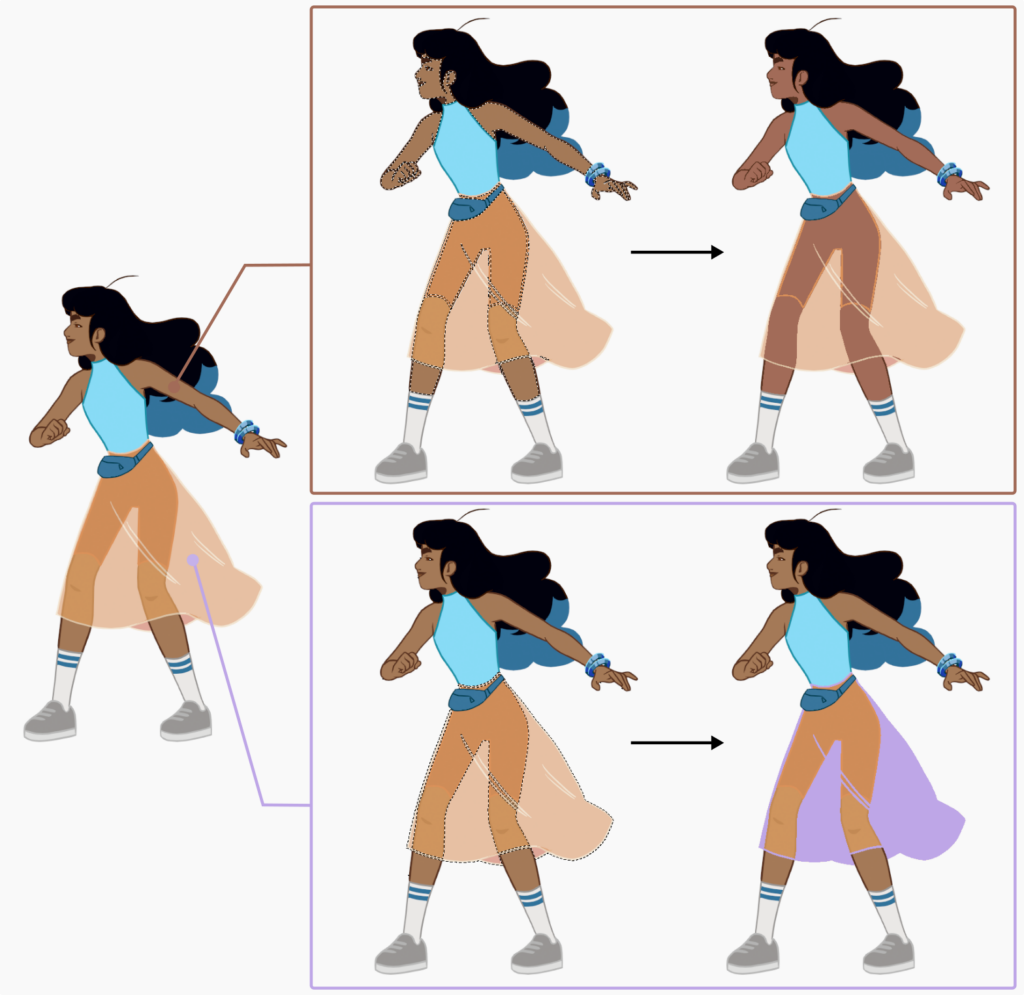
One of the strength of the Grease Pencil is its vector data, which allows the user to dynamically change the colors through color vertices or materials. We choose to focus on the use of materials, because they are more easily editable in the UI, and because they usually bear semantic information in their organization and in their names. Vector shapes with same material share all of the material information, including fill and stroke colors. Thus, if you affect a specific material, let say for the skin of your character, then you can edit the color of the skin of your character directly from one controller on the whole animation.
Editing the colors of a grease pencil material is a destructive operation, and affects directly the color palette. A non-destructive way to affect the colors of your drawing is to use grease pencil modifiers. In particular, you can use the modifier “Tint” to apply a different color on top of your drawing. By default this would be applied to the whole grease pencil object. There is also a possibility to filter the influence of these modifiers on a layer or a material. We can thus create a non-destructive color mapping by applying one modifier per material. This list of modifier is not really convenient to manipulate.

Example of tint modifier applied to the character Billie, with three different values of factor.
We wanted to combine the directness of the bitmap approach, with the accuracy of the vector approach, in a non-destructive way. We developed the Grease Pencil Color Mapper, which allows you to override materials in new colors. At high level, the user can create a list of existing materials, and chose a color for each of them. At lower level, the add-on automatically creates and drives a list of Tint modifiers doing the overwrite in a non-destructive way. This system currently works with flat colors only.
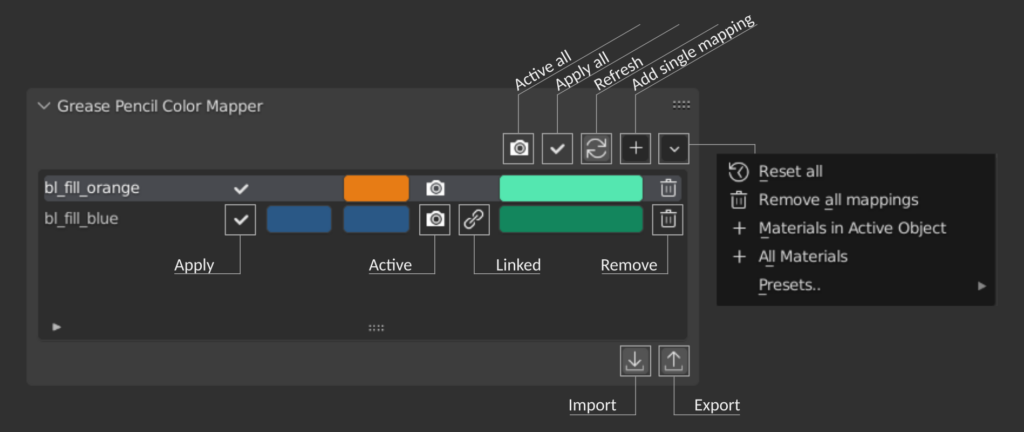
Overview of the user interface of the color mapper.
The UI displays the list of mappings, with the name of the source material, its corresponding stroke and fill colors, and the mapped colors. If the material contains both a stroke and a fill color, then the mapping can be linked, meaning that both colors are mapped to the same target color.
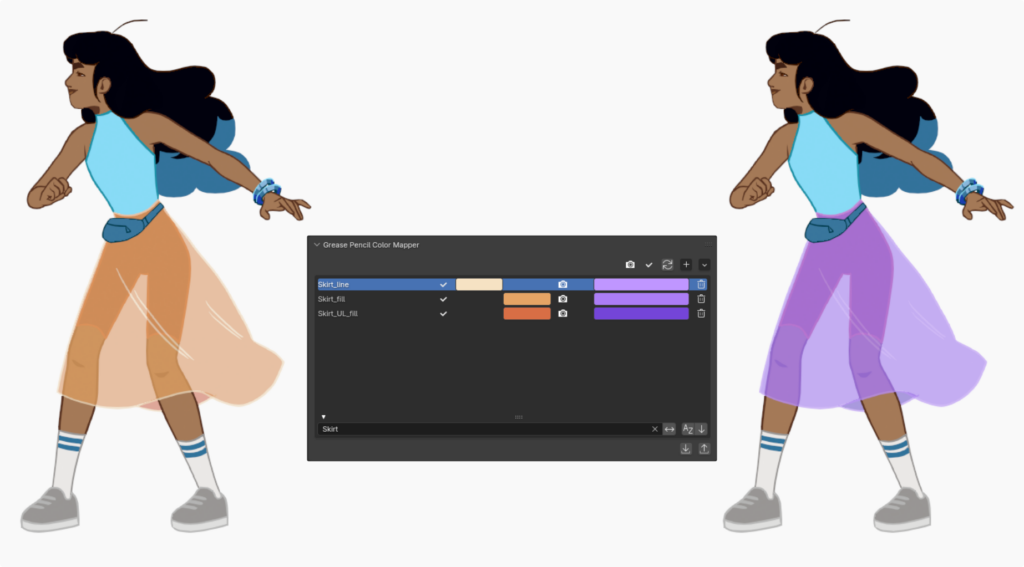
Example of simple color mapping to change the skirt from orange to purple.
We implemented a tool to pick directly a material from the viewport, which is a more intuitive and efficient way to create and edit the list of mappings. We will explain the technical details in a specific post (stay tuned).
The color mapper is a basic tool to switch color palettes in a non-destructive way. It can be used to apply a mapping based on a bitmap reference of the mapped character. If you want to try it, it’s available on our gitlab.
This video shows how the color mapper can be used to create a mapping based on a reference color script image. As you can see in the video, this method can be difficult in case of semi-transparent materials, but the good thing is that each color can be adjusted manually to fix these specific cases.
In theory, it can also be used to explore new mappings directly in Blender. Selecting colors one by one to affect a specific mapping seems however restrictive to achieve a fluent exploration. One way of overcoming this restriction is to edit mappings globally. We implemented this as presets, now only containing the color-to-gray preset, but which could be extended to other color → color function. However, we can easily see the restrictions of this filter-like system, which lacks local control.
What’s next ?
It seems like a better approach would be a hybrid method with local, semi-local and global editions. A naive implementation would allow to lock some materials, and edit the rest of them through a global operation, such as a translation in HSV space for example. The user could then select only the materials corresponding to the skirt of the character for example, and shift their hue, or their value while keeping all the unlocked material untouched.
There is still a great deal of work to do on this color exploration system to become actually practical. One of our main reference for our future work is the paper of Mellado et al. from 2017 [1] (project page). Their approach uses a graph representation of the color palette to define color transformations in a non-linear way across the palette. We also plan to do some work on the UI design to find a better way to navigate across a large list of colors with semantic meaning.
[1] Mellado, N., Vanderhaeghe, D., Hoarau, C., Christophe, S., Brédif, M., & Barthe, L. (2017). Constrained palette-space exploration. ACM Transactions on Graphics (TOG), 36(4), 1-14.