For one of our projects we had to handle 1300 shots, using 600+ different 2D backgrounds. Those sets were composed from one to more than 100 layers (underlays —e.g. buildings—, overlays—trees in front of the characters—, skies,…), annoying to handle and set properly in Blender. So we created a small add-on called Camera Plane.
Saving time and making use of 2D sets, made easy
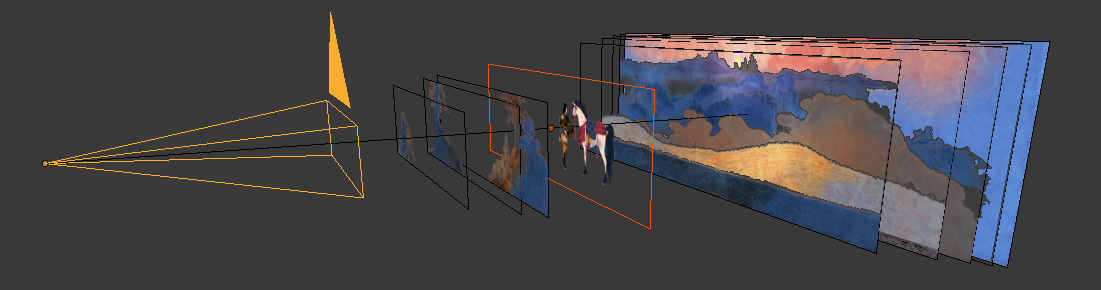
The main purpose is to create a plane containing the layer(s), just like ‘Import Images as Planes’ will do. But instead of being floating somewhere, that plane is parented to a camera, facing it, and there is a very simple slider to set the distance from the camera to the plane. This makes it easy to import multiple layers at once, setting up the distance of every overlay and underlay according to the 3D elements.
Since the plane is parented to the camera, it’s following its position and rotation. Using drivers we also had it locked to the field of view (FOV) or focal length. This allows you to make changes without having to scale each layer. Of course this is not suitable for animated cameras: we often add a camera just for the sets (like a camera you might have for a camera mapping) and then the shot, or action, camera.
Using it
Once loaded, the tool appears in the Camera Panel panel in the object properties once you select a camera. You click “Import Camera Plane”, select one or more image files, and then the tool imports the images by alphabetical order, parents them to the camera and sets up the drivers for the FOV.
You can now customize the position by just selecting the plane and using its two custom properties:
- distance: the distance between the camera and the plane
- scale: change the size of the plane in camera space, as a percentage of the camera width. 100 means “fill the camera horizontally”.
Note that you should create set images with the same aspect ratio as the camera. So if you create a double width set for a pan, setup the camera ratio as the layer ratio (3840×1080 or in my example here a precise ratio of 4035×1080 is set in the render panel).
As mentioned, the planes are parented to the camera, so you are free to set it up as you need.
Scaling the planes
The scale property, which we called “passe-partout” at one point, was made because we did not build the sets barely fitting the camera view, but we added a safe area around. In case the layout had to change the framing and get some content out of the background, we just had to paint in the safe area instead of setting everything up again. You might not use that parameter and leave “100” in most cases.
Changing the FOV
Changing the FOV or angle of the camera will update automatically the size of the planes. So, as you can see at the bottom, it doesn’t affect the sets from the point of view of the camera, and you can adapt your camera to the 3d space:
Same goes for the camera’s X and Y shift.
Anyway, we are curious to know how you might use it. Let us know!
The tool is available on our GitLab and from Blender’s own extension platform.
3 Comments
Luciano
niiiice !
Robert
I’ve just installed under 2.83 LTE but it doesnt show up under camera’s object properties…Can you help me?
Flavio Perez
hi Robert !
The version on github is deprecated, but we should have updated the article.
The last version, with many updates, is compatible with 2.8/2.9 and is available here : https://gitlab.com/lfs.coop/blender/camera-plane
Can you try it and let us know if it’s still broken for you ? 🙂
Thanks !
Flavio